List of Environment Settings on Mac OS X
Clean Install
Xcode
Install Xcode from Mac App Store.
You can skip this if you do not need to have Xcode. In fact, the command line tools can be installed without having Xcode.
Command Line Tool
Install Command Line Tool from Terminal
xcode-select --install
This works even if Xcode is not installed in you Mac.
Homebrew
Install homebrew.
Emacs
Install Emacs with cask:
brew cask install emacs
Edit ".emacs.d/init.el".
Cmake
brew install cmake
Doxygen
brew install doxygen
graphViz
brew install graphviz --with-app --with-bindings
hdf5
brew tap homebrew/science
brew install hdf5 --enable-cxx
OpenMPI
brew install open-mpi
GSL
brew install gsl
TeX
Download "MacTeX.pkg" from
and install it.
Pythia
Add lines below in ~/.zprofile or ~/.zshrc. XXXX is version nunber of your pythia.
export PYTHIAINSTALLDIR=''location of pythia root directory''
export PYTHIA8DIR=${PYTHIAINSTALLDIR}/pythiaXXXXX
export PYTHIA8_ROOT_DIR=${PYTHIAINSTALLDIR}/pythiaXXXX
Edit Pythia's Makefile.
-include Makefile.inc → -include $(PYTHIA8DIR)/Makefile.inc
FastJet
or
brew install fastjet
Enable to use FastJet in Pythia. In Pythia's root directory,
./configure --with-fastjet3="your fastjet's location"
ROOT
Add lines below in .bashrc. root_XXXX is root directory name of your root.
export ROOTSYS=''location of root_XXX''/root_XXXX/
export PATH=$PATH:$ROOTSYS/bin
export LD_LIBRARY_PATH=$LD_LIBRARY_PATH:$ROOTSYS/lib
export PYTHONPATH=$ROOTSYS/lib:$PYTHONPATH
Python (Anaconda)
Copy the path for Anaconda saved in ~/.bash_profile to ~/.zshprofile. Enable to use the other version of python.
conda create -n py36 python=3.6 anaconda
Add lines below in .bashrc.
alias py3='source ''location of anaconda root directory''/anaconda2/bin/activate py36'
alias py2='source ''location of anaconda root directory''/anaconda2/bin/deactivate'
Then, you can use commands to switch between python 3 and python 2:
python3→python3: 'py3'
python3→python2 'py2'
PyROOT with Anaconda's Python
[Attention] The method below does not work with current version of Annaconda.
otool -L ''location of root directory of root_XXX''/root_XXXX/lib/libPyROOT.so
In my case,
@rpath/libPyROOT.so (compatibility version 0.0.0, current version 0.0.0)
/System/Library/Frameworks/Python.framework/Versions/2.7/Python (compatibility version 2.7.0, current version 2.7.10)
@rpath/libTree.so (compatibility version 0.0.0, current version 0.0.0)
@rpath/libRIO.so (compatibility version 0.0.0, current version 0.0.0)
@rpath/libCore.so (compatibility version 0.0.0, current version 0.0.0)
/usr/lib/libc++.1.dylib (compatibility version 1.0.0, current version 400.9.0)
/usr/lib/libSystem.B.dylib (compatibility version 1.0.0, current version 1252.0.0)
Then,
sudo install_name_tool -change /System/Library/Frameworks/Python.framework/Versions/2.7/Python ''location of anaconda root directory''/anaconda2/lib/libpython2.7.dylib ''location of root directory of root_XXX''/root_XXXX/lib/libPyROOT.so
Again,
otool -L ''location of root directory of root_XXX''/root_XXXX/lib/libPyROOT.so
You can see
@rpath/libPyROOT.so (compatibility version 0.0.0, current version 0.0.0)
''location of anaconda root directory''/anaconda2/lib/libpython2.7.dylib (compatibility version 2.7.0, current version 2.7.10)
@rpath/libTree.so (compatibility version 0.0.0, current version 0.0.0)
@rpath/libRIO.so (compatibility version 0.0.0, current version 0.0.0)
@rpath/libCore.so (compatibility version 0.0.0, current version 0.0.0)
/usr/lib/libc++.1.dylib (compatibility version 1.0.0, current version 400.9.0)
/usr/lib/libSystem.B.dylib (compatibility version 1.0.0, current version 1252.0.0)
Now you can use PyROOT in Anaconda's python.
HepMC
iCloud
Maka a symbolic link:
ln -s Library/Mobile\ Documents/com~apple~CloudDocs ~/iCloud
RSA Key permission
chmod 0600 ~/.ssh/'key's name'
others
・Three Finger Drag
SystemPreference → Keyboard → Mouse & Trackpad → Trackpad Options... Trun on "Three finger drag."
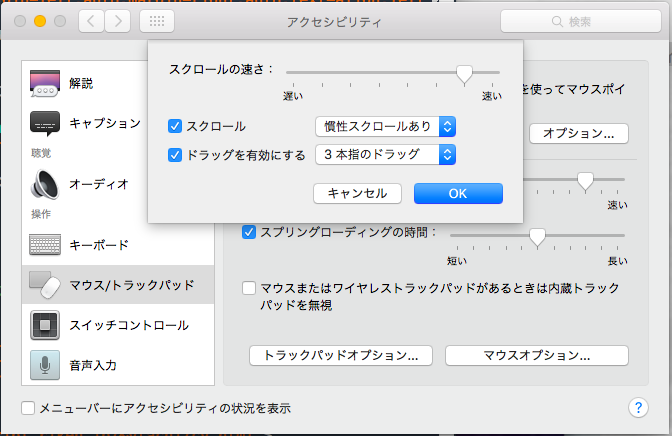
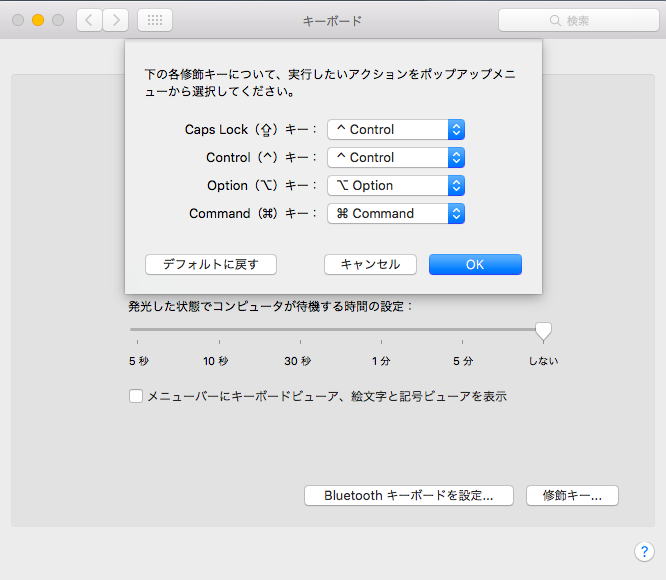
・Caps Lock Key → Control Key
SystemPreference → Accessibility → Modifier Keys... Choose "^Control" for CapsLock
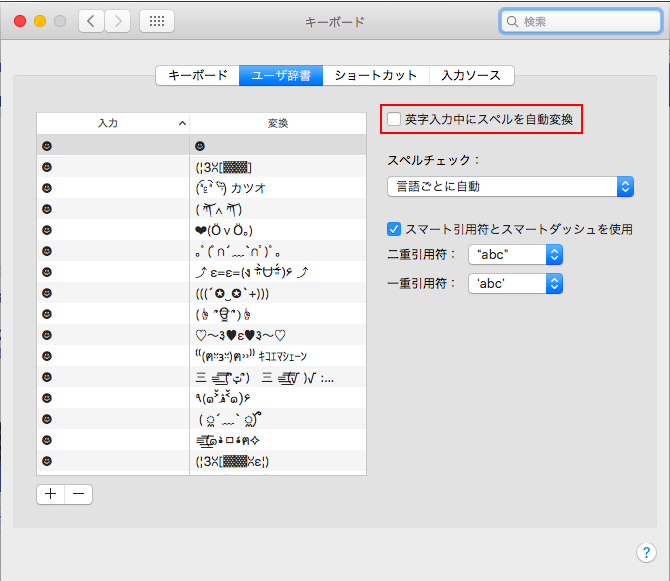
・Trun off automatic spelling correction
SystemPreference → Keyboard → Trun off "Correct spelling automatically."